Tuesday, August 6, 2013

22 Awesome Pregnancy Announcement Ideas

Just a few months ago we were announcing that we were expecting our first little bundle of joy!  I've been addicted to looking through so many others sharing that joy and coming up with the most cute, unique, clever ideas for how to announce their baby.  Here are 22 awesome pregnancy announcements to hopefully give you some ideas of how to announce your baby.


Love this idea using a baby onesie to announce the pregnancy.  I might do this for our next little one, I love how cute it is! 

Have a pet you want to include in your pregnancy announcement? 

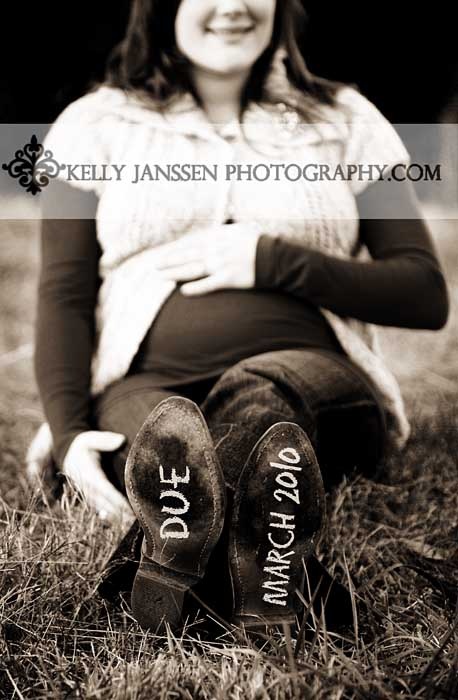
How cute is this using the bottom of your shoes to write the due date.
Haha, I love this cute saying of growing by two feet.  Such a cute idea to take a picture then add text wherever you would like.

Chalkboards are popular right now. This family put the year they were born and then a picture of their family together with the year to announce their new baby.

I love this picture as well! I don't live by a beach, but drawing this in the sand is so cute, especially since I read this couple got engaged here as well.  That would be fun to go to where we were engaged to take pictures of us announcing our pregnancy... well at least next time.

An ultrasound says it all... Holding up your first ultrasound is a cute idea to announce your pregnancy.

Another cute chalkboard idea to announce your pregnancy, love how this is the whole background.

Here's a cute idea, this is a small bin to keep their library books in.  They put the due date for the baby on the side.

So cute, using a chalkboard with your other children to announce your baby's birth date.
You can purchase chalkboard through: Pearl Pear Designs

Or with your other babies (aka dogs or cats) to announce your pregnancy.
 You can purchase chalkboard through: Pearl Pear Designs


Or if it's just the two of you.
You can purchase chalkboard through: Pearl Pear Designs
You can purchase chalkboard through: Pearl Pear Designs

Using food is another great idea to announce you're pregnant.  Take a picture with you and your spouse holding these or take it randomly out and see your family's reaction.

I absolutely love this idea as well using first comes love, then comes marriage, then comes...
They even had a baby carriage to announce this pregnancy.

Haha, fun idea including your husband being pregnant. 

Bump ahead sign for this pregnancy announcement

I love this picture with both of them looking down on the belly with a 'waiting for you' sign.  

Using these name blocks or number blocks to announce the baby's due date is another cute idea.

Such a cool idea, get your ultrasound projected on your belly to announce that you are pregnant. Great idea.

I love this idea for announcing your pregnancy to your spouse. A big card with "you're going to be a DAD"

Here is another funny announcement. Both parents holding up things they will no longer use or need in the upcoming months and a "for sale or trade for crib" at the bottom.  Very clever.

I love when the older siblings participate.  Love their cute little "big brother" "big sister" shirts to announce their new baby.

And lastly, a picture with your feet and a cute pair of shoes showing you are expecting along with using chalk to write the due date.  

Monday, August 5, 2013

8 Top Baby Boy Clothing Trends: FALL 2013

Looking for cute and trendy baby boy clothes this fall? Look no further, here are 8 trends including Old Navy, Gap, Janie and Jack, H&M, Zara, and Osh Kosh B'Gosh from colored jeans to quilted tops.

1) Colored trousers and jeans


2) High-top baby shoes


3) Plaid button-ups


4) Knit baby Hats


Gap knit hat: $14.95


5) Neutral Baby Moccasins

6) Quilted Outerwear


7) Chambray / Denim for baby

8) Layering tops


From Gap:


From: Zara

From: H&M

Osh Kosh B'gosh outfit


Saturday, August 3, 2013

$50 Trendy Tummy Maternity Giveaway!

Looking for comfortable and trendy pregnancy clothes? Trendy Tummy Maternity has so many cute styles and colors that makes every pregnant woman feel sexy and beautiful.  Starting today, I'll be hosting a giveaway for one lucky winner to take home a $50 e-gift certificate for anything at Trendy Tummy!
Enter with Rafflecopter below, giveaway ends August 31, 2013.

The picture below is me in Trendy Tummy Maternity's Stylish Lace Chevron Tube Maternity Maxi Dress.  It is new to Trendy Tummy Maternity and I love the fit and colors and can't wait to continue wearing this after the baby is born. It came right before our trip (last one before baby) and it was perfect wearing in the hot desert heat especially since the lace allows air into the dress without me showing my swollen legs :)


Here are some of my other favorites from Trendy Tummy Maternity, they have all kinds of trendy maternity and nursing clothing and products to help you feel your best.  Besides clothing, you can find anything from Belly Bandits, nursing covers, hospital gowns (which are super cute), skincare product and more!


Maternity clothes from Trendy Tummy: 
Maternity Dresses
Maternity Tops
Maternity Jeans
Maternity Leggings
Maternity Bottoms
Maternity Cardigans
Maternity Activewear
Maternity Sleepwear
Plus-size Maternity 

So enter below with Rafflecopter for your chance to win a $50 e-gift certificate for your favorite Trendy Tummy Maternity products! Good luck, giveaway ends August 31, 2013.


a Rafflecopter giveaway

Wednesday, July 31, 2013

Organizing Tips for your Baby's Closet

If you are looking to organize your baby's closet, here are some tips that might help you along the way.  I redid the closet a few times and could have used some tips. 

1) Do you like having your things laid out or hidden (bins)? For me, I bought BINS

I love when things are organized and everything isn't out in the open.  I prefer boxes/bins which, I admit, can take a little more time taking things in and out, but it helps me keep organize and know where everything is.  So my first step was to buy boxes/bins.  I got these from Zulily in different sizes of what would fit into the closet. I made sure they were durable, neutral color to be used in other locations in the house later on if needed.

2) What things are going to be in the closet or in other places in the nursery?

Do you have other places to store your baby's things? If you have a changing table, you probably will have the diapers and wipes right there for convenience, if you have a dresser and want to only keep clothes in there you don't need to add clothes in the closet.  Find out what makes sense and what is more convenient.
Anyway, I laid out all of the baby's things in the middle of the floor and started sorting.  

3) Sort the closet items

Since I had different bin sizes I figured out what things would go in which boxes by laying everything in the middle of the floor and sorting them into piles then picking the box that would match the size. I also remembered that I haven't bought everything for the baby so I also estimated how many more onesies, blankets, etc. I would be adding to the closet/bins.

4) Label up

Labels are an easy way to know what things are in each box.  It doesn't help only me, but others who might come in looking for things. I used a blue that would match with the rest of the nursery and could easily be replaced if in the future we would have a little girl.

I used the Silhouette to cut out the shadow and words in vinyl.

Right now here is a look of the closet. Usually you can't change the structure of the closet, but everything inside can have a certain place and purpose in the closet.

Saturday, July 27, 2013

DIY Heat Transfer Onsie with Silhouette


What you'll need:
Silhouette
Onesie (mine is from Michaels)
Heat Transfer Sheet
Iron and ironing board

1) Open your shape you want to cut in your Silhouette Studio.  Image needs to be flipped horizontally to work.
Object - Transform - Flip Horizontally
 2) Enter your Silhouette Cut Settings, the Heat Transfer Material will be added WITHOUT the cutting mat.  Make sure to add the 'flocked' or 'smooth' heat transfer setting.

3) Place your Heat Transfer with shiny side DOWN


 4) Send to the Silhouette = CUT

 5) Cut around your shape and peel off the negative areas.

 6) Place image centered on onesie with shiny side up
 7) Place sheet in,between onesie and iron and press for 45-60 seconds.  If  it doesn't fully stick, hold iron again until it does (I had to do it about three times, maybe my iron wasn't hot enough?)
And ta da!  Awesome finished product!