
- taking pictures
- being uplifted from others
- singing in the car
- peppermint gum
- making goals
- listening to rain
- dancing
- watching musicals
- creating something beautiful
- being with my family
- playing with animals
- BYU
- sunny Sundays
- rolling down my car window and feeling the warm air in the summer
- rainbows
- fun traditions
- laying in the sand
- watching waves
- listening to uplifting words
- my Savior
- serving
- laughing
- country music
- fresh flowers
- cuddling in a warm blanket
- inspirational thoughts
- pink
- seeing others happy
- making someone's day
- my heroes
- good examples
- ppl standing up for whats right
- smiling
- blue skies
- warm showers
- cute jewelry
- designing
- budding trees and plants
- trying something new
- someone going out of their way and thinking of me
- someone telling me I made their day
- finding great deals
- delicious desserts
- my initials on things
- summer dresses and flipflops
- getting involved
- sharing the gospel
- having inspirational/scriptural quotes around me
- going on a mini adventure
- finding joy in the journey
Monday, April 5, 2010
50 Things I Love
I'm so grateful for all that I have. I've been thinking about some of the things I enjoy in life. These are in no order of course because the Lord, family, friends are first. Things I love:

Sunday, March 21, 2010
Rosette Headbands
I'm cropped out because I look goofy, but here is the finished headband that only took like half hour. I made a pink/white one and the black one below


The fabric that works best is a double-sided fabric that is more thick. I chose this paisley one below and it was white on one side and pink on the other which gave the rosette more dimension.
To start you cut about a half-inch to an inch and however long you would like (usually at least a foot to three feet). You can iron it in half or I just continuously folded it.

To start you just fold the fabric at one of the ends and keep on wrapping it around, sewing it with a needle and thread to hold it in place.

I kept twisting the fabric and positioning it before I placed the needle in. I kept the edges untrimmed so it became like this. I made two roses for this headband. This was a bigger one then I made a smaller one. When I finished I just cut off an extra inch or two and sewed it flat on the back of the rose.

Here are the two roses with the headband I glued them too.
Here's the black one I also put together


All done. I placed three together for this one


The fabric that works best is a double-sided fabric that is more thick. I chose this paisley one below and it was white on one side and pink on the other which gave the rosette more dimension.
To start you cut about a half-inch to an inch and however long you would like (usually at least a foot to three feet). You can iron it in half or I just continuously folded it.

To start you just fold the fabric at one of the ends and keep on wrapping it around, sewing it with a needle and thread to hold it in place.

I kept twisting the fabric and positioning it before I placed the needle in. I kept the edges untrimmed so it became like this.
 I made two roses for this headband. This was a bigger one then I made a smaller one. When I finished I just cut off an extra inch or two and sewed it flat on the back of the rose.
Here are the two roses with the headband I glued them too.

Here's the black one I also put together


All done. I placed three together for this one

Saturday, March 20, 2010
My Birthday Dreams - aka National Holiday
Chris gave me the best birthday ever! I slept in and we went out for breakfast then we watched one of my favorite musicals.

I picked Wingers to go for dinner and my sister and her friends came to visit and a few of our other friends came to celebrate! For my birthday Chris surprised me with a Cricut!!! Pretty good choice I have loved doing things with it I was really surprised thanks Chris! I look like such a Goober, this is right after I opened it
 After dinner we went to Chris' house where his family wanted to wish me a Happy Bday. He surprised me with a Magleby cake which are INCREDIBLE and baby Brynlie and Coleman helped me blow out all the candles which I can successfully do still... even with 22

Cute picture of Chris and Baby Lucie My roommates were so nice and decorated some of the apartment
 You can tell a little bit but there was balloons and streamers all over

Thanks for the awesome birthday. Thanks especially Chris for thinking of me and planning a day all for me :)

I picked Wingers to go for dinner and my sister and her friends came to visit and a few of our other friends came to celebrate!
 For my birthday Chris surprised me with a Cricut!!! Pretty good choice I have loved doing things with it I was really surprised thanks Chris! I look like such a Goober, this is right after I opened it
 After dinner we went to Chris' house where his family wanted to wish me a Happy Bday. He surprised me with a Magleby cake which are INCREDIBLE and baby Brynlie and Coleman helped me blow out all the candles which I can successfully do still... even with 22
Cute picture of Chris and Baby Lucie
 My roommates were so nice and decorated some of the apartment
 You can tell a little bit but there was balloons and streamers all over
Thanks for the awesome birthday. Thanks especially Chris for thinking of me and planning a day all for me :)
Blog Make-Over
So, I graduate in a month from today which is so crazy. I can't believe its coming to an end after 4 years. I have had the best time of my life here at BYU and I'm so sad to be leaving it behind, but of course its time and I need to graduate.
BYU has given me so many great experiences and now its time to "go forth to serve" as our motto states. I'm not fully sure whats next in store, but I know that with trusting in the Lord and doing everything I can everything will be ok.
BYU has given me so many great experiences and now its time to "go forth to serve" as our motto states. I'm not fully sure whats next in store, but I know that with trusting in the Lord and doing everything I can everything will be ok.
My Blog Works!
So weird, my blog was down for a while but I think the problem is fixed. I wanted to blog so bad for the last month I'm so glad its back!
 In my Landscape Architecture class we're doing a bunch of cool landscapes for our projects. This is one of the landscapes I drew and completed. I really like the architectural style of writing we have learned.
 In my Landscape Architecture class we're doing a bunch of cool landscapes for our projects. This is one of the landscapes I drew and completed. I really like the architectural style of writing we have learned.
Sunday, February 21, 2010
Valentine's Day!!!
So much fun this last Valentine's Day. Unfortunately it landed on a Sunday this year, but Chris did some cute things on Saturday. He came over that night and had a bunch of roses (which are in the back), awesome chocolates, a card which I cried in, and my favorite... skittles.
It was so funny because Aimee and I are pretty much the same... she also got roses, heart shaped box of chocolates like me.. AND skittles it was weird.

Me so happy with my flowers from Chris. He took me to Tucanos which is a Brazilian restaurant here in Utah with amazing food that they bring around and have you try all different kinds of food and meats.
I got a rose there too and some chocolate covered strawberries which I love. Later that night we had to go to someone's bday but after he surprised me with a movie... not just any movie.. but an all-time favorite... Rescuers Down Under! The one with the mice. I LOVE that one, a few weeks ago he was going to surprise me with a Disney movie but it was so cute that he chose one for us to watch.
Today he so thought about me and everything he did had so much thought and was completely for me :) Thanks babe
 Valentines Day: So I went to Chris' ward on Valentine's Day and since it started at 1:30pm I went over early and we made Swedish Pancakes together. They turned out great it was a recipe I had from my mom. I also made a cookie bouquet with a sister in law that I gave to him along with this big Vday card. I'm so proud I used all of the candy and hopefully it doesn't sound bad because its not supposed to haha.

Us before church. My parents sent me a Valentine's day package and I got this cute pencil skirt from H&M which I was dying to wear. We had so fun. Oh I also had a digital picture frame we had a bunch of pictures we've taken rolling. So cute!!! Thanks so much for all you do and thinking of me!!!

It was so funny because Aimee and I are pretty much the same... she also got roses, heart shaped box of chocolates like me.. AND skittles it was weird.

Me so happy with my flowers from Chris. He took me to Tucanos which is a Brazilian restaurant here in Utah with amazing food that they bring around and have you try all different kinds of food and meats.
I got a rose there too and some chocolate covered strawberries which I love. Later that night we had to go to someone's bday but after he surprised me with a movie... not just any movie.. but an all-time favorite... Rescuers Down Under! The one with the mice. I LOVE that one, a few weeks ago he was going to surprise me with a Disney movie but it was so cute that he chose one for us to watch.
Today he so thought about me and everything he did had so much thought and was completely for me :) Thanks babe
 Valentines Day: So I went to Chris' ward on Valentine's Day and since it started at 1:30pm I went over early and we made Swedish Pancakes together. They turned out great it was a recipe I had from my mom. I also made a cookie bouquet with a sister in law that I gave to him along with this big Vday card. I'm so proud I used all of the candy and hopefully it doesn't sound bad because its not supposed to haha.
Us before church. My parents sent me a Valentine's day package and I got this cute pencil skirt from H&M which I was dying to wear. We had so fun. Oh I also had a digital picture frame we had a bunch of pictures we've taken rolling. So cute!!! Thanks so much for all you do and thinking of me!!!

Wednesday, February 17, 2010
Tiled Portrait of the Savior
Supplies for the Project: Black paint, wooden board cut into squares, Modge Podge, pour on coating, paint brushes, picture

For this project I chose a picture of the Savior and a board about 15x12 inches from Roberts. It already cut into the square and with a Roberts 50% off coupon I bought the piece of wood for about $4.

I found the picture I wanted and would I set it on the wood to measure how big I needed to cut it. Here, I am using a pencil to mark where it needed to be cut. Make sure that the picture covers the whole tile well enough to not wrap around into the cracks of the wood or the picture won't flow or match as well.

As a warning: careful of the pictures you use or their positioning on the wood. I had to center my picture a little off-center or it would have been cutting the Savior's face in half. ALSO, make sure that your paper is thick or durable. Too thin of paper will allow the coating to soak through which isn't good.

Next I painted the board black and filled in all the gaps and spaces too.

I used Mod Podge to carefully glue on the picture.

With other paper I had, I placed a border around my picture and also used the tiles around it to add some paper and color (like in the top left corner).

I wanted my tiled work to say "I know that my Redeemer lives" so I printed it out in Word and would lay it down on my picture and trace through. I then went back with black paint to trace the saying.

When everything is dry and glued on, I placed the wood on two equal sized cans (to raise it up so the coating will just run over) with newspaper underneath.
The Coat On I used was equal to 50 layers and I was able to complete my project with 4oz of it. I mixed them together and with two people I would pour and use a flat edge (like a popsicle stick or a straw I guess) to smooth everything out on top. Make sure to get the edges and have it fall off the edges.
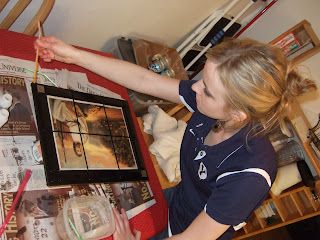
Here I am using a straw to blow inbetween the cracks to get out the coating.

Here it is!!!! I waited about 24 hours till it was pretty dry but allowed about 48 hours. Again, make sure the picture is thick enough so the coating won't soak in!

Subscribe to:
Posts (Atom)


